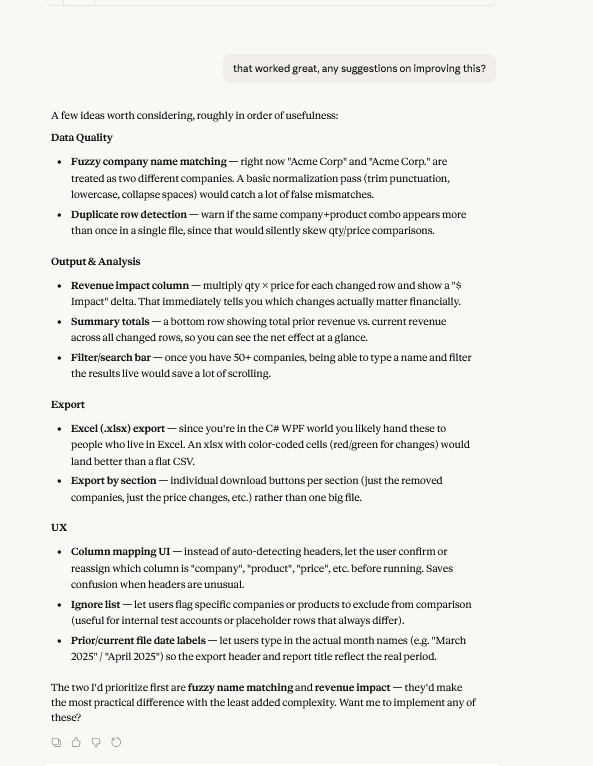
The next logical step after the last post is to created a python “Hello World” app on my Raspberry Pi.
Lets try Chat GPT this time, you have probably already figured out the Claude excels at these tasks.
We are going to reuse the same prompt as last time with a couple of changes:
Create a step by step guide, writing a “Hello World” program in Python, use IDLE, on my Raspberry Pi, assume the reader has zero knowledge of Python and or this project. I want to remote in via the built in VNC feature on the Rasberrian OS
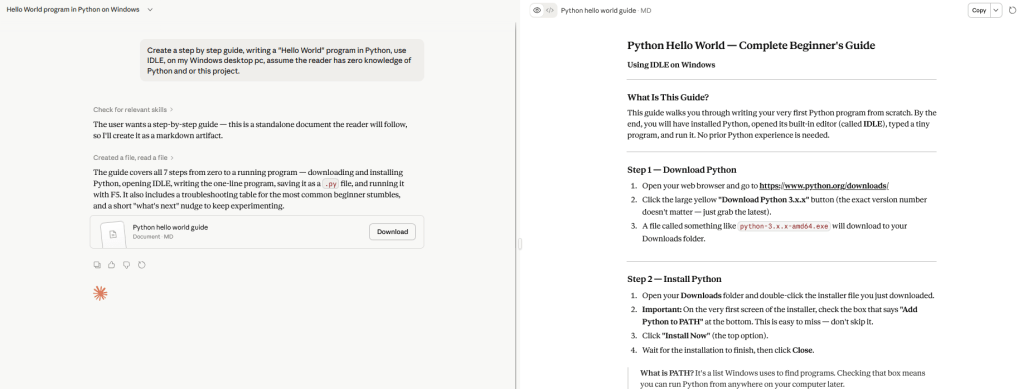
One of the things you notice first is that the results do not come in that nifty right sidebar with a complete code download button out of the box.
I did ask for a nicer version.
🐍 Raspberry Pi Python “Hello World” Guide
Using VNC + IDLE (Beginner Friendly)
🎯 Goal
By the end of this guide, you will:
- Connect to your Raspberry Pi remotely
- Open Python’s editor (IDLE)
- Write your first program
- Run it and see:
Hello, World!
🧰 What You Need
- Raspberry Pi with Raspberry Pi OS
- VNC enabled on the Pi
- Another computer with VNC Viewer installed
- IDLE available in the Raspberry Pi menu
🌐 Step 1: Connect to Your Raspberry Pi (VNC)
- Open VNC Viewer on your computer
- Enter your Pi’s IP address
- Click Connect
- Log in with your Pi username and password
✅ You should now see your Raspberry Pi desktop
🖥️ Step 2: Open Python (IDLE)
- Click the Raspberry Pi menu (top-left corner)
- Go to Programming
- Click IDLE or Python 3 (IDLE)
💡 A window called Python Shell will open — this is normal
📄 Step 3: Create a New Python File
- In the Python Shell window, click File
- Click New File
🪟 A blank editor window will appear
✍️ Step 4: Write Your First Program
Type this exactly:
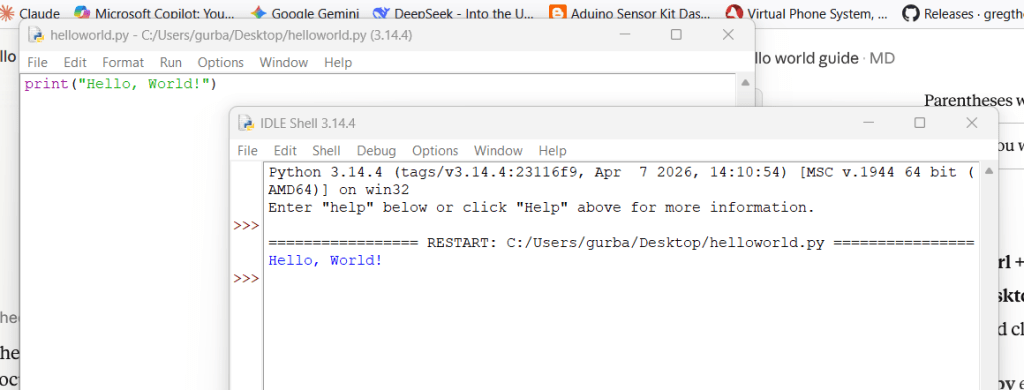
print("Hello, World!")
⚠️ Be careful with:
- Parentheses
( ) - Quotation marks
" " - Spelling of
print
💾 Step 5: Save Your File
- Click File → Save
- Choose a location (Desktop is fine)
- Name the file:
hello.py
- Click Save
▶️ Step 6: Run the Program
- Click Run → Run Module
(or press F5)
🎉 Step 7: See the Result
Look at the Python Shell window.
You should see:
Hello, World!
✅ Success! Your first program worked.
🧠 What Did You Just Do?
print("Hello, World!")
print→ tells Python to display something"Hello, World!"→ the message
👉 Together: show this message on the screen
🧪 Try This Next
Change your message:
print("Hello from my Raspberry Pi!")
Save and run again.
⚠️ Common Mistakes
❌ Missing quotes
print(Hello, World!)
✅ Correct
print("Hello, World!")
❌ Misspelling print
prit("Hello")
✅ Correct
print("Hello")
❌ Forgot to save before running
✔ Always save before pressing F5
🛠️ Troubleshooting (If IDLE Is Missing)
1. Check Python
Open Terminal:
python3 --version
If you see a version → Python is installed ✔
2. Try launching IDLE manually
idle
or
idle3
3. If IDLE is not installed
sudo apt updatesudo apt install idle -y
Then try again:
idle
4. If it still doesn’t appear in the menu
sudo reboot
⚡ Quick Version (Cheat Sheet)
- Open VNC Viewer → connect to Pi
- Menu → Programming → IDLE
- File → New File
- Type:
print("Hello, World!")
- Save as
hello.py - Press F5
- Look for:
Hello, World!
🚀 What’s Next?
Try:
name = "Your Name"print("Hello, " + name)
💡 You’ve just written your first Python program — nice work.
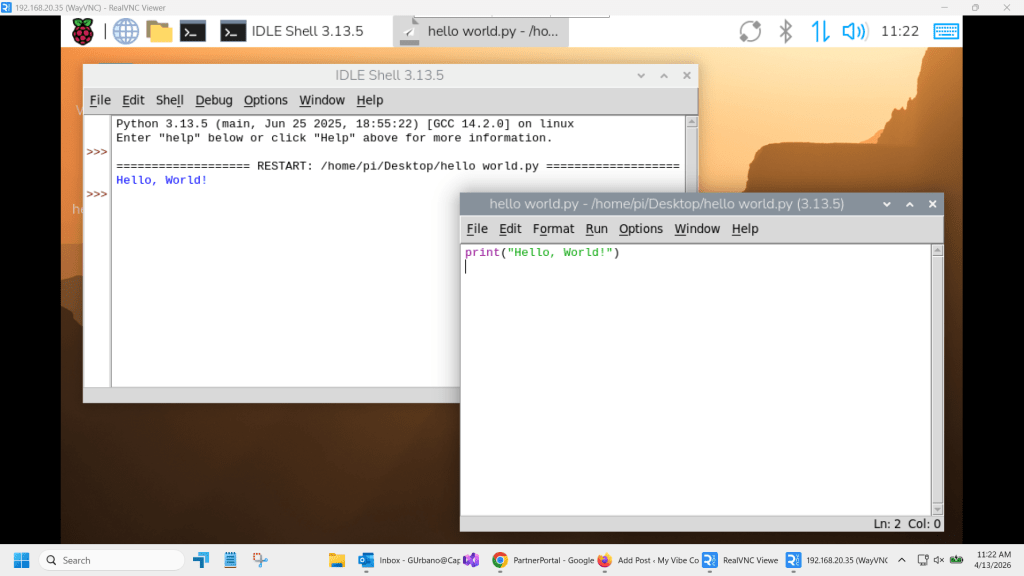
Success! We now have a hello world program written in Python on a Raspberry Pi!